Table of Contents
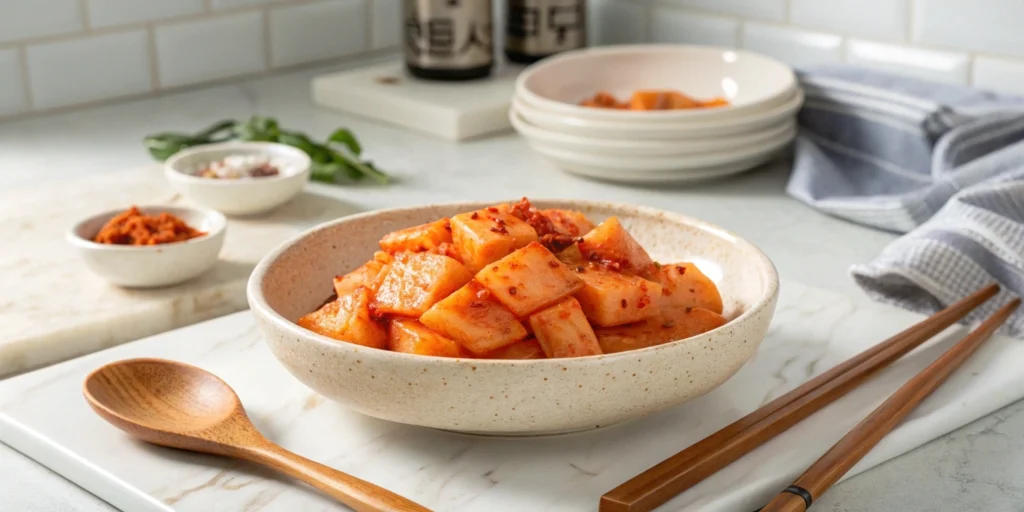
The bold crunch of Korean radish kimchi, known as kkakdugi (깍두기), isn’t just another side dish—it’s a traditional powerhouse of flavor, health, and cultural heritage. With only a few simple steps and everyday ingredients, you can create your own batch of this irresistibly tangy, spicy ferment right from your kitchen. Whether you’re reviving your roots or experimenting with fermented foods, this version of kkakdugi is approachable, vibrant, and sure to become your go-to banchan.
What Is Korean Radish Kimchi?
You’ve probably tasted cabbage kimchi, but kkakdugi offers an entirely different texture and bite. It’s made from Korean radish (mu), which is shorter, thicker, and firmer than daikon. Unlike napa cabbage varieties, kkakdugi is cubed and fermented with a fiery blend of spices and aromatics, resulting in bite-sized chunks that burst with umami and a subtle sweetness.
What makes this dish truly shine is its simplicity and its ability to complement almost every Korean meal—especially soups and stews like galbitang or seolleongtang. It’s that clean, crisp crunch that balances out heavier mains and resets your palate between bites.
Why This Recipe Works So Well
You’re not just getting another kimchi recipe—you’re unlocking a staple that works for busy weeknights and special family meals alike. This 3-step process is intentionally streamlined while staying rooted in the core of Korean home cooking.
Here’s why you’ll love it:
- Fast prep, slow reward – Ready to jar in under an hour, with depth that grows over days
- Health-boosting – Fermented for gut support, radish for digestion, garlic for immunity
- Beginner-friendly – No exotic tools, just your hands, patience, and a little counter space
What You’ll Need to Get Started
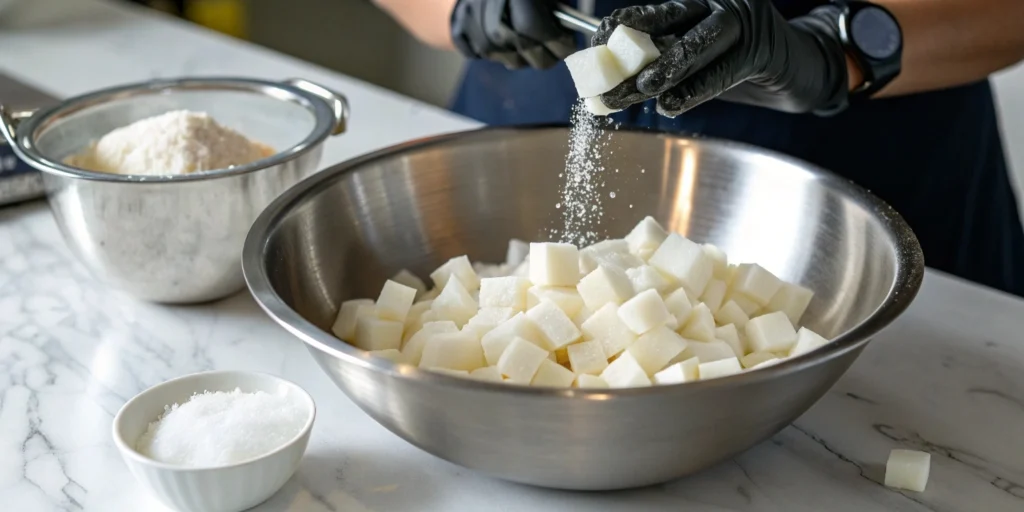
You’ll need one large Korean radish—about two pounds. Look for one that feels heavy, has smooth white skin, and ideally has its green tops still attached (a sign of freshness). After peeling it, you’ll cube the radish into uniform pieces, roughly three-quarters of an inch in size.
To start the brining process, toss the cubes with two tablespoons of kosher salt. This helps draw out moisture and firm up the texture, ensuring that satisfying crunch.
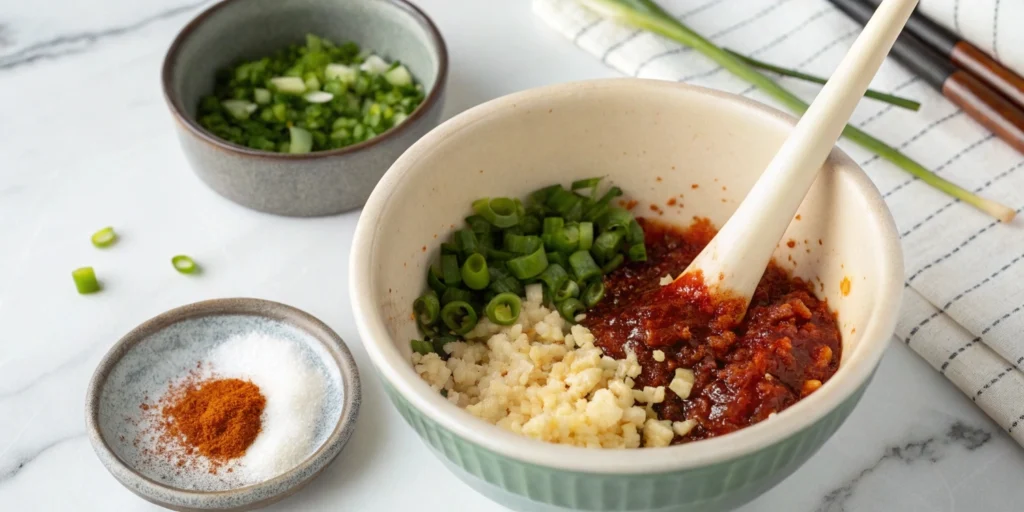
As your radish sits, prepare your seasoning base:
- Three tablespoons of gochugaru (Korean red pepper flakes),
- Two tablespoons of fish sauce,
- Two teaspoons of finely minced garlic,
- One teaspoon of grated fresh ginger,
- One teaspoon of sugar,
- And two stalks of green onion, finely chopped.
In a separate bowl, mix the gochugaru, fish sauce, minced garlic, grated ginger, sugar, and green onion until it forms a deep red, clingy paste.
If you prefer a vegetarian version, swap out fish sauce for soy sauce or fermented soybean paste (doenjang) diluted in warm water.
Choosing the Right Radish
| Feature | Korean Mu (Ideal) | Japanese Daikon (Substitute) |
| Texture | Very dense and crunchy. | Softer and more watery. |
| Flavor | Peppery with a sweet finish. | Milder, slightly more bitter. |
| Fermentation | Stays crunchy for weeks. | Can become soft/spongy faster. |
| Prep Tip | Leave some skin on for extra “snap.” | Best to peel fully as skin is thin. |
Step 1: Salt the Radish
After peeling and cubing your radish, you’ll toss it thoroughly with kosher salt in a large mixing bowl. Let it sit for 30 to 40 minutes. Every 10 minutes or so, give it a stir with your hands to help the salt evenly penetrate the cubes.
You’ll notice a pool of water forming at the bottom—that’s the radish releasing moisture. This step helps with texture but also preps the radish to soak up the marinade better later.
Avoid rinsing the radish after draining. A light brine coating adds to the final flavor.
Step 2: Create the Seasoning Paste
You’ll combine this paste with your brined radish cubes. Using food-safe gloves, gently massage the mixture into the cubes until every surface is coated. Gloves aren’t mandatory but highly recommended—they protect your hands from the chili and ensure better mixing.
At this point, the smell should already have that distinct kimchi aroma—spicy, garlicky, and just a little funky.
Step 3: Ferment and Store
Now it’s time to pack your seasoned radish into a clean, airtight container. Don’t fill to the brim—leave about an inch of space to allow for fermentation gases to expand. Press the radish down firmly so there are no air pockets.
Let the container sit at room temperature for 1–2 days, depending on your climate. In warmer settings, you’ll see bubbles and a slight tang by the end of the first day. Cooler kitchens may need closer to 48 hours.
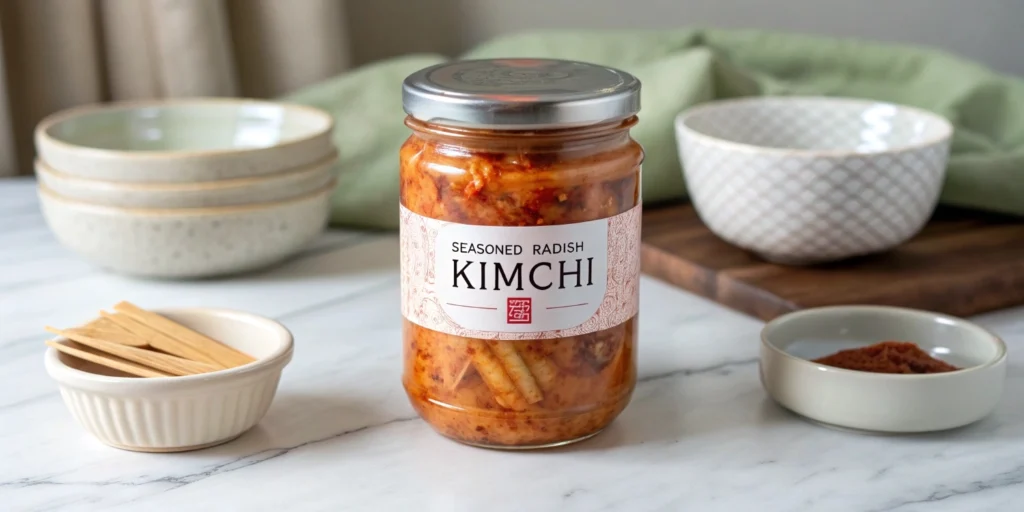
Refrigerating it at this stage slows the fermentation and allows more layered flavors to emerge over time.
Once your kkakdugi starts to ferment, move it to the refrigerator. It’s ready to eat after a few days, but best around day 7—and keeps improving for up to a month.
Pro Tip: How to Tell if Your Kimchi is “Alive” Don’t just rely on the calendar; use your senses! After 24 hours on the counter, take a clean spoon and press down on the radish cubes. If you see small bubbles rising to the surface, the fermentation is active. Give it a sniff—it should smell tangy and slightly “fizzy,” not foul or rotten. If you see these bubbles, it’s the perfect time to move it to the fridge to develop that deep, complex flavor slowly.
Health Benefits You Didn’t Expect
Korean radish kimchi isn’t just flavorful—it’s a nutritional goldmine.
1. Packed with Natural Probiotics
The fermentation process cultivates beneficial bacteria like Lactobacillus, which improves digestion and enhances nutrient absorption. You’re supporting your gut without supplements—just real food.
2. High in Vitamin C and Fiber
Korean radish is loaded with vitamin C, essential for immune function and skin health. Its fiber content helps keep your digestive system running smoothly.
3. Low in Calories, Big in Flavor
Each serving of kkakdugi is naturally low in calories but intensely satisfying, making it a smart choice for mindful eating. It’s also keto- and paleo-friendly if you skip the sugar or substitute it with a small amount of pear puree for natural sweetness.
What to Eat With Kkakdugi
Once your kkakdugi hits its flavor stride, you’ll want to add it to everything. Here are some of the best pairings:
- For soups, add a spoonful to dishes like galbitang or seolleongtang to brighten the flavor with a crisp kick.
- Rice companion: Pile it next to steamed white rice and enjoy it as a crunchy, spicy bite.
- Bibimbap booster: Add it into your bowl for extra texture and depth.
- Protein power: Serve alongside grilled pork belly (samgyeopsal) or even roast chicken.
- Tofu topper: Toss it on silken tofu with a splash of sesame oil for a quick, balanced snack.
You’re not limited to tradition—kkakdugi plays surprisingly well with modern meals too. Add it to grain bowls or even sandwiches for a spicy twist.
Watch Out for These Common Pitfalls
Even simple recipes can go sideways. Here’s how to keep your kkakdugi crisp, clean, and crave-worthy:
- Using watery radish – Daikon is often too soft and wet. Korean mu holds up better.
- Skipping the salting time – That 30- to 40-minute window is crucial for texture.
- Over-packing your container – Leave room for gases or risk a messy overflow.
- Too little time – Patience is key. Rushing fermentation will leave you with flat flavor.
- Not tasting as you go – Feel free to adjust the spice, salt, or sweetness to your liking.
Frequently Asked Questions About Korean Radish Kimchi
Question 1: Why is my kimchi brine turning “slimy” or thick?
Answer: This usually happens if the temperature in your kitchen is too warm (above 75°F/24°C) or if you used too much sugar. It is still safe to eat, but the texture might be off. To prevent this, move the jar to the fridge sooner next time or add a slice of onion to the paste to regulate the bacteria.
Question 2: Do I need to use “Sweet Rice Flour” paste?
Answer: Many traditional recipes use a “porridge” (풀 – pul), but for this 3-step version, we omit it for speed. The natural starches in the Korean radish provide enough food for the healthy bacteria to thrive, so you still get that signature tang without the extra cooking step.
Question 3: My kimchi is too salty! Can I fix it?
Answer: Yes! If it tastes too salty after the first day, slice a few thick rounds of raw radish or carrot and tuck them into the jar. They will soak up the excess salt as they sit in the brine.
Your Turn: Time to Ferment Something Amazing
You’ve now got the tools, tips, and step-by-step instructions to make your own batch of instantly famous Korean radish kimchi. With every crunchy bite, you’re not just enjoying a side dish—you’re part of a tradition that spans generations.
Leap. Cube that radish. Mix that paste. Wait a few days. Then watch your kitchen transform with the bold aroma and satisfaction only real, homemade kimchi can bring. Ready to start fermenting?
Snap a photo of your kkakdugi, tag it with #DelumarKimchiLove, and join the community that’s bringing tradition back to the table—one radish at a time.